Showing posts with label DIY. Show all posts

Wednesday, September 23, 2015

What to do with louvered doors

 I have a love hate relationship with louvered doors.   I like the free flow of air into closets,  but I dislike all the vertical lines and fussiness.   Many houses built in the eighties sport this type of door.  We have removed some of ours and replaced them with a contemporary looking slab door more in keeping with the streamlined look I like, and we decided to update others.  


And here's the last remaining set we have just waiting for a facelift.....

How to update louvered doors

Designing Home: Updated louvered doors 


All you need is 1/8 inch MDF or plywood  (some doors may have enough room for 1/4 in. ) and construction adhesive, (PL Premium is my favourite). 

 Lay the doors on a table or bench and measure the size of each panel area.  Cut the wood  to cover each  louvered panel section,  add a dot of adhesive every third slat next to the border and press the wood panel in place.  It should fit snugly, if not you can always caulk any seams before painting.

Use clamps or add something heavy to hold each panel in place and let it dry overnight.  Add new handles of your choice.

Reusing louvered doors for new projects 


When you remove the doors in favour of new ones you are left with two perfectly good doors that need a new life.  

Designing Home: Louvered bathroom cabinet


Here's the cabinet my husband made for our summer house  from the top half of two closet doors.  It nestles nicely into a small alcove in the main bath and holds things you don't want on display. It also gives you a great surface for changing vignettes.  We decided against hardware because you can easily open by using a louver as a pull.  It also gives it a more contemporary feel. And now what to make from the bottoms???

There are so many creative ideas for louvers on Pinterest.  I admit that many of them have a very country or beach feel to them,  but if you crave a more contemporary look there are ways to achieve it.

These are my top three faves:

Headboard 

source

Painting the louvers  black  the headboard  a very contemporary feel that I quite like.


This treatment is much more country, but could be updated  if they were painted charcoal and the bedding was adjusted accordingly.


Sofa table 


The straight lines of this table make it suitable for any decor. Colour and what you put on it can automatically update the look.


Standing Shelves 


Jessica Monroe

If you wanted this to have a more contemporary feel you could paint shelves and sides the same colour and add plain crown to the top and bottom.

So many creative uses for louvers.  I love to see materials getting a new life!

Monday, December 30, 2013

Reclaimed wood works


 Old is good. What is old can be new again with a little ingenuity, and I don't mind admitting that the art side of my brain has lots of that.   I think reclaimed wood  is beautiful, and this summer I made great finds on the beaches near our summer house.

Are you wondering how this connects to decor?  Keep reading!

reclaimed wood Newfoundland
Atlantic Ocean beach wood
 Storm tossed and sea sanded house/shed remnants  were dragged home against my better half's judgement. At the time I answered the strong call emitted by these materials, but  I didn't know why I needed them.  My art often begins with the call of materials rather than with sketches and preconceived notions of a final product.

 Margaret Ryall Duntara workshop
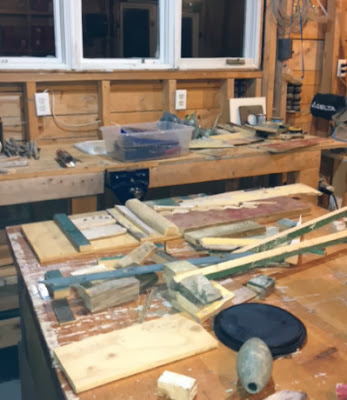
Not a pretty site/sight
No this is not the home decor section!

Move over hubby,  I am taking possessions of your precious workshed and tools.  Yep!  I know my way around drills, bandsaws, chopsaws and sanders and I discovered construction adhesive will stick most everything together. Drop paintbrushes, fine papers and canvas.  I have a new palette and perhaps a new series for exhibition.

This one is my keeper.
Reclaimed wood assemblage Beach Quilt Margaret Ryall
Beach Quilt, Margaret Ryall, 2013, reclaimed wood
 And here it is in the back entry of my summer house.  I have to wait until May to see it again (and take some decent shots of it).

You've reached the home decor part
Stay tuned for more creative moments in my life.  What have you created for your home lately?

Wednesday, February 15, 2012

No one will ever know

 You can never have too many vases or luminaries. Creating your own  from materials on hand is both fun and cost effective.  You also get to have the pleasure of looking at it every day and knowing that you upcycled something.  Of course, accolades from your friends and family don't go astray either.

  Here are some of my personal favourite ideas collected from  Pinterest.    Happy creating.


 I would use these for their sculptural value and forget the greenery which looks forced.  Get various shapes and sizes of clear wine bottles.  Tape off or use adhesive stickers to create design.  Spray paint white and there you have it.  So easy and they would look very interesting massed together on a table top or mantle.


So, so easy!  Use elastic bands  to stretch around  around the clear cylinder vase .  Vary the position of the bands and make sure you have some overlapping, then spray paint. When the candles are lit the design is greatly enhanced. You can now buy battery powered candles which would work best in something this tall.


Check out the very detailed instructions for creating this tissue paper collaged vase.


 You may have seen this idea in Canadian House & Home.   Wait for a nice day where you can take your spray paint outside. Clean (remove any labels and adhesive)  and dry the bottles and then by pouring a dollop of paint into the bottle, gradually rotate/swirl the paint inside until the paint coats the entire interior. Some may need two coats. Dry on a damp or plastic dropsheet.  I think the colour you use will make or break this look.  I'm particularly fond of the sea glass green blues.
Update: Watch a video how-to by Stephanie White on House and Home's TV.


 Print your photo on Lazertran paper, making sure the image prints on the chalky eggshell side. Let dry for 30 minutes. Cut the image to size. Soak the printout facedown in a pan of water for about a minute. Peel off the backing and place the filmy printout onto a ceramic vase, smoothing out any air bubbles.


These look stunning and they are so, so easy to make using Krylon  Looking Glass Mirrorlike  Spray Paint. Clean out the vases/votive,  spray the interiors lightly with water and then with mirror paint. Turn upside down and let dry overnight.  Repeat the process if the first application looks too sheer. If you want to use them for flowers you have to inert a small glass inside to hold the water. Imagine the beautiful table centerpiece these would create using some with flowers and some with candles.


Sunday, January 8, 2012

DIY wow factor for walls

If I had oodles of money I would buy all the art my heart desires and I would have more walls!  In reality I have an interesting  art collection that I've grown over time , but not all of my wall decor is fine art.  There are so many other things you can do to add a WOW factor to your walls without breaking the bank.  Here are some of my favourites.

Enlarge and frame print material


Display your collections artfully 

Pinterest


Use wall paper and fabric in creative ways


Frame post cards, pages from old books, or photoographs


Spray paint sculptural objects
Hope there's an idea here for your walls.

Friday, December 9, 2011

Christmas decorating- mini trees

One of the standard Christmas motifs is the tree. You can use the mini version to decorate in various ways.  Many simple forms can be created from scratch and others can be purchased.   You are limited  only by your ingenuity.

Stylized Trees


 Ah, it seems buttons can be used for everything.  I quite like this tree in white.  Use white topped stick pins to attach the buttons to the styrofoam form.


  Use a foam tree form covered in Saran Wrap and  wrap yarn or string around it.  Slather with white glue and let dry. Remove the form.  Decorate as you prefer.This is so simple, kids could do it.


 These trees are all covered in tissue paper used in various ways.  The tutorial at the above site is excellent.I love how the small rosettes were created.
Natural  twine (jute or hemp)  wrapped forms with a red cloth /tray looks very effective.Adding the white berries further enhances everything. 


 This is a perfect use for scrapbooking papers. There are so many patterns out there to match any decor.  


This is a modern twist on an old favourite. You can leave them up all year. They look  good because of the strong black white contrast and patterning.

Trees from nature


Pine cone topiaries can be purchased or created .  They look best when there are two of them used  symmetrically to bank a fireplace or accent table.
.

Use flower foam and white carnations to create this interesting centerpiece. I'd skip the tiny ornaments and have a green pot.


Small potted trees offer many options in the home. This woodland inspired decor in white is lovely.


Rosemary trees and other naturals are popular at Christmas time, but how do you integrate them into your decor in a interesting way?  Consider antique jugs or  pails and arrange on steps or on a mantle.   

There you have it.  Day 5 of Christmas decorating ideas.  I could go on but I'll refrain and save some for next year.


Monday, December 5, 2011

Christmas decorating - 12 unique wreaths you can make

Wreaths are part of Christmas and there are thousands of different designs in the market place. These wreaths are not the bought kind.  I selected them because they are quirky, interesting and easily crafted at home with a bit of elbow grease and ingenuity.  Check the links provided for instructions. 


 Cut twigs into slices on a band saw and glue on a foam wreath form.   Love it.  If you don't know someone with a band saw, you need to cultivate a new friend! I would skip the bow and just use a burlap loop.

Cover a wreath form with satin ribbon and glue on seed pearls. That should keep you busy for awhile.


You can purchase large MDF letters at Michael's  or cut your own.  It is important to seal MDF with primer or Varathane before beginning. Water and MDF are not a good match!. I would paint the form red before attaching the berries with glue.  If you can't find MDF letters, cut one out of foam core that can be purchased at any art supply store.  

 CasaSugar

Feathers are hot this year. The appearance of yours will depend on the kinds of feathers you can find.


 Love the warn wreaths that seem to be everywhere this Christmas.  It's a great way to use up odd bits of yarn.

I've loved buttons since I was a child.This white-on-white wreath is so cute. Simply wrap a straw wreath with cream-colored muslin fabric and stitch on a multitude of pearly buttons.It you're not in a stitching mood, use hot glue.


 3 D paper stars are beautiful when  massed into a wreath. Directions can be found at link above.


 This is a take on ornament wreaths that have been around for awhile.  This one is very effective because of the colour scheme and the variety in ornament sizes.There are detailed instructions on the link above.


 I can't resist silver stars on green. This can be purchased but it would be so easy to make.

 Good Housekeeping

This one is for the birds!  Recycle a wooden frame by covering it with nontoxic glue, then sprinkling it with bird seed. Place the wreath outdoors for all your feathered friends.


 First, wrap a straw wreath form with red ribbon, then use a hot-glue gun to attach each piece of candy.I've seen a similar one with striped peppermint candy. Very effective.

And who could resist a wreath made out of old bling?

If you have a favourite unique wreath I'd love to hear about it. 

Gambar Belangkas